How to Build a Storage Shed From Scratch
In this article I look at some simple methods on how to build a storage shed from scratch, cheaply and easily with the right plans, in the backyard or garden.
Most homeowners with a good sized backyard or garden will find they need somewhere to store things like garden tools, plant pots and other gardening paraphernalia and all manner of bits and pieces that they don't want in the house.
A spacious shed can satisfy your garden storage needs as well as take the excess stuff from the home that has nowhere else to put it.
Note: This page contains affiliate links for products I promote.
Is it Hard to Build a Shed from Scratch?
 Actually, it is not very difficult to build a shed from start to finish.
That's as long as you have the right building materials, the necessary tools, a flat, open space to put it and good, easy-to-follow shed building plans.
You also need to possess at least average handyman skills to do all the work yourself, but shed construction is, for most people, an achievable task.
How Do You Build a Shed on a Budget?
If your budget is fairly tight, you'll want to explore the possibility of sourcing low-cost materials for the construction first.
Second, you should be prepared to do all the work of building that shed yourself. It helps if you are sufficiently proficient at joinery and woodwork in general with an aptitude for building things from the ground up.
Let's look at which of the lowest-cost materials you might consider for the job.
What is the Cheapest Material to Build a Shed?
There are a number of low-cost materials options to consider when building a shed.
Using pallets that you find by the roadside (which are free) is effectively the most cost-effective way to construct a shed. However, the labor cost in time and effort is higher because you'll need to tinker with the pallets to make them fit.
If you prefer to build using better quality materials, sourcing cheap lumber and other relevant building materials locally is the best way to save money.
Building Materials Transportation
Transporting the building materials to your home is another matter that should be considered when building a shed as cheaply as possible.
Unless you have a large station wagon or a truck, it may be cheaper to get the merchant to deliver everything in one go on a big truck. This can be more cost-effective than you wasting gas on making several journeys in your own vehicle.
Pros and Cons of Building Your Own Shed
While it can at first glance appear daunting to undertake the task of building your own garden shed from scratch, it can be a rewarding experience.
There are some advantages and disadvantages (pros and cons) to building any type of shed yourself, so let's cover these before we get into the building advice later on in this article.
Pros
Possible the main advantage of building a shed yourself is the cost saving side of things.
It costs a lot less to source your own materials and then to construct the building yourself using your own tools and know-how along with well laid out plans.
Another advantage is that you get to create a shed to your own design or use a plan to make a shed the way you want it to look.
Above all, there is little more satisfying than standing back to admire your work when you've completed the build!
Cons
The main downside to putting up a shed in your backyard yourself is the time and labor that you are required to put in in order to save money by not paying someone else to do it for you.
There is no way around this, because it takes some strength to move the materials, some of which can be heavy, into place. It takes some skill to put things together correctly and ensure the building is properly squared off on all sides and stands vertically at 90° to the level ground.
Obtaining Shed Plans
While it is possible to build a garden shed from scratch without propriety plans if you're already a professional and skilled builder or carpenter, for most mere mortals, some good, detailed shed plans are essential to getting it right.
There are plenty of free plans available online that yo can search for and they'll get you so far.
However, if you want to build a professional looking shed that will not only be sturdy and safe as well as lasting a lifetime, you should almost definitely seek out professional quality plans.
These do not come free but the relatively low cost of purchasing the best shed building plans is recouped by saving on costly mistakes that can occur when using low-quality free plans.
Right now, I've found the best value, best quality shed plans can be purchased online by clicking the promotion image below:
I am an affiliate of Ryan's Shed Plans
They don't cost all that much and you'll be getting access to a large collection of different styles and designs of sheds to choose from.
Each plan includes full instructions as well as a lot of hints and tips from a professional shed builder.
How Do You Build a Simple Storage Shed?
 Now, on to the nuts and bolts part of things. Let's look at how to construct a garden shed for storage or functionality as you require.
I will start with a tools checklist, so you'll have the right implements to do the job. Before starting, it's a good idea to have all your tools organized so they're close at hand when you need them.
Bear in mind we're looking to do this without spending a lot of money and some of the bigger power tools that would make the job easier will also make it more expensive.
Shed Building Tools
At the very minimum, you'll need the following tools to get the job done in the most cost-effective manner:
- A tape measure
- Speed square
- Hand saw
- Hammer
- Drill with assorted drill bits (for wood)
To save costs, I like to recommend using a corded drill. This will have plenty of power to drill any hole or drive any screw you'll need and you probably already have one in your toolbox.
A long extension cord is a must, since you'll need power from the house.
A good quality claw hammer is your best friend when working with wood. Nails are much cheaper than screws and they have a better shear strength. Using nails will also save money.
Wood always seems to need cutting when you're erecting a wooden building, so a sharp hand saw is a good first choice for staying within budget.
A miter and/or circular saw with reduce labor and make life easier, but they can also be expensive.
Using a 14in handsaw will take longer and require some muscle and sweat from you during the shed build, but will save money if you don't already have a power saw.
Now let's look at what the shed is going to stand on.
The Foundation
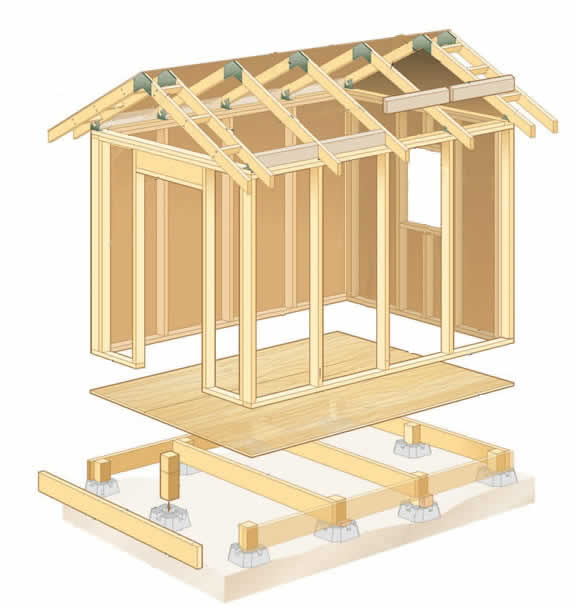
 There are a number of alternative ways to make a shed foundation, from creating a concrete slab base to using concrete piers or blocks.
Let's look at what I consider to be the best low-cost option for a self-build outbuilding.
Concrete blocks used for making decks are fairly cheap to buy and you can get them ready grooved to accept 2x lumber. This is useful for resting the floor framing planks so they don't slip.
Finding a suitable site to place erect the shed is also important, as is planning its orientation with regard to the asthetics of the yard/garden. It has to be flat and level, obviously!
You can improve the site by digging down a few inches and adding gravel, raking it out flat to form a dry sub-base, but it's not essential unless you get a lot of rain in your area.
Place your concrete blocks at each corner and then in line to support the floor frame, evenly spaced without too much space between them, depending on the size of the intended building.
Framing the Floor
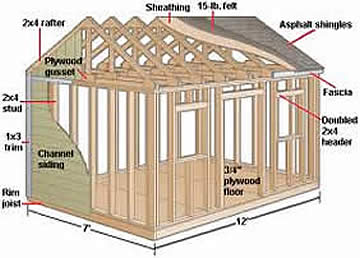
Create a floor frame that is sturdy and will last a long time, using treated 2in x 6in lumber for the best strength and longevity.
Make sure the frame is square by measuring and then measuring again to be absolutely sure before making any cuts.
Framing the Walls
You should be using 2in x 4in lumber for the wall frames, again for good strength and durability.
The planks do not need to be treated (untreated lumber is cheaper) as the frame will be protected from the weather by the external skin (siding).
Framing the Roof
For the same reasons with the wall frames, using 2in x 4in lumber for the roof frame with give you good strength and durability.
This especially important if you get heavy snow in winter as the extra weight sitting on the roof can be considerable and can cause warping and drooping if using smaller 2in x 3in beams.
The difference in cost is not very much, so opt for stronger 2in x 4in lumber and enjoy peace of mind that your shed will be able to stand up to the rigors of the weather, no matter what gets thrown at it.
The roof design can help you mitigate costs. A single slant roof is generally the cheapest option, as it uses less lumbar.
A gable roof will use slightly more wood than a single-slant roof. That's because for a length of 2in x 4in, a gable requires four angle cuts.
To cut down on waste and minimize costs, you can plan the roof slope to use just one 2in x 4in per rafter.
Wall Siding
Finding the best value way to side a shed is not quite as straightforward as you may think. That's because there are many options available to you.
Arguably the easiest and most affordable way to side a shed is to use a painted, engineered 4ft x 8ft panel that is designed for exterior exposure. It is fairly easy to fasten it to the framing with nails and costs less than most other methods.
Plywood siding panels can be more expensive and have the problem of not holding up as well when constantly exposed to moisture unless it's painted. This creates an additional cost that you can avoid by using an LP panel.
There are other options such as lap siding or shingle siding. However, these can cost more as they require more material.
Roofing
A well-built, sturdy and weather-proof roof is the crowning glory to any shed!
There are a number of options for weather-proofing a shed roof, but probably the lowest cost solution is asphalt shingles over an LP panel skin.
This is a fairly easy roofing method to construct and is far more cost-effective than other options such as metal roofing (most expensive), as well as rubber or plastic corrugated panels.
Windows and Door
 While it is always possible to omit fitting a window (or windows) to keep costs to a minimum, it is always nice to have some natural light in sheds.
To keep costs low, you could include a single window on the south-facing side for maximum daylight if you build the frame and glaze it yourself. Many good shed plans include window frame layouts to help you.
Installing at least one door can't be avoided, so it's good practice to have purchased a weather-proof door and frame before construction started and planned for the opening when constructing the wall frame.
To save money on the purchase price of an exterior door (which can be expensive) you can make your own from 2in x 4in lumbar and spare siding. Some of the best shed plans will include the blueprints for making a shed door!
Get Your Shed Plans
If you kept reading down to this point, congrats! You really do want to build yourself a great shed!
But if you didn't watch the video above telling you all about where to get the best quality blueprints for building a shed you'll love, no problem.
Just click on the image banner below to visit Ryan's Shed Plans site and watch his video that explains it all...
I am an affiliate of Ryan's Shed Plans
Summary
As a side project or hobby, it can be a lot of fun to construct your own shed in the garden or yard. As long as safety is observed and you have the skills, there is no reason why you shouldn't do it!
When choosing to build your own garden shed for storage or any other reason, you can save a lot of money when compared to buying a pre-made shed that includes installation by a professional craftsman.
There are some for and against arguments associated with a self-build shed. However, in general, as long as you have some handyman skills, good quality plans and are not afraid to do some hard work, the rewards can be a professional looking storage shed that you will be proud of!
Last Updated: September 17, 2023
(Top)

